Containerized Django Development:
Exploring Docker, CORS, and CSRF
1.0 Overview
Hey everyone! I recently kicked off a new project – my Portfolio Admin Application – and as always, I started with setting up my local development environment. Now, I’m a big fan of efficiency, so I’ve built up a reusable codebase that lets me spin up a production-ready Django environment in just minutes using Docker. Think of it like my own personal Django starter kit!
This reusable library is constantly evolving. Whenever I discover a new way to automate things and speed up the process, I add it to my toolkit. My ultimate goal? To have a single script that sets everything up automatically with just one terminal command!
In this article, I want to share this library with you and walk through how it works. It’s partly a reference for myself (future me will thank me!), but I also hope it can be a useful resource for other developers. And hey, if you have any suggestions for improvements, I’m all ears!
Here’s what we’ll cover:
- 1. Dockerized Django with Daphne: We'll use Daphne to run our application in both debug and production modes, all within a Docker container.
- 2. Hot Reloading: No more manually restarting the server every time you make a change! We'll set up hot reloading for a smoother development experience.
- 3. VS Code Integration: For all my fellow VS Code users, we'll create a launch.json file for easy debugging.
- 4. ASGI and GraphQL: We'll enable ASGI and use the Strawberry GraphQL library for our API endpoint.
- 5. CORS and CSRF Protection: I'll share some of the challenges I faced (and solutions I found!) when implementing CORS and CSRF protection for my GraphQL API.
By the end of this article, you’ll have a fully functional Django application running in Docker, ready for deployment. I will not mention the steps to setup the environment as I have already added a detailed step-by-step instruction to setup the environment in the README file of the GitHub source code. You can even check out the source code here. In this article, I will discuss the theoretical aspect and the reasoning behind it. Let’s dive in!
2.0 A Bird's-Eye View: Decoupling with Docker
Alright, let’s map out the architecture of our application. I’m going to assume you’re already comfortable with Docker and Docker Compose. If not, no worries! I’ve included some helpful resources in the references section at the end.
With Docker up and running, we need to craft some configuration files to bring our Django application to life. But first, let me paint you a picture of the overall plan.
Imagine this: we’ll have a PostgreSQL database happily residing in its own Docker container. Our Django application will live in a separate container, managed by its own Docker Compose file. This separation of concerns brings some awesome benefits:
1. Database Independence: By decoupling the database configuration from the application, we gain flexibility. Need to switch databases down the road? No problem! Just update the environment variables with the new connection string.
2. Deployment Simplicity: When it’s time to deploy, we can focus solely on the application container. The database can be handled independently, making our deployment pipeline smoother.
But wait, there’s more! Both containers will be connected through an external Docker network. This adds another layer of decoupling, keeping our network configuration separate from the application itself. This means we can easily adapt our setup for different environments, like Kubernetes or Amazon VPC, without touching the core Docker Compose file for our Django application.
Here’s the summary:
1. We’ll have a Docker Compose file for our Django application.
2. We’ll have a separate Docker Compose file for PostgreSQL.
3. Both will communicate seamlessly through an external Docker network.
This modular approach keeps things clean, flexible, and ready for whatever deployment adventures lie ahead!
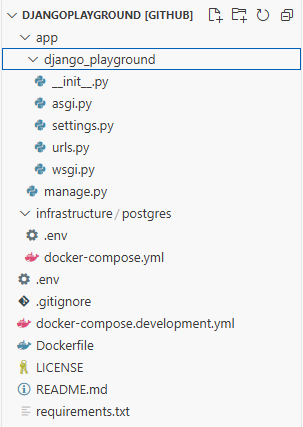
This image contains the directory structure of our boilerplate application. It is mainly divided into three parts:
1. app/ folder: This folder contains source code related to our Django application. We can generate this app through our docker compose file.
2. infrastructure/ folder: This folder contains the docker configuration files to start Postgres and Pgadmin. It also contains the mounted volume of our Postgres and Pgadmin containers.
3. Docker configuration files for Django: The base directory contains some other files such as docker-compose.development.yml, requirements.txt, Dockerfile, and .env. These files contain the docker configuration for our Django application.
3.0 Using Daphne and Async
Let’s talk performance! Asynchronous operations are like the superheroes of the coding world. They allow our application to juggle multiple tasks concurrently, leading to a significant boost in speed and efficiency. Python has embraced this superpower with the Asynchronous Server Gateway Interface (ASGI).
Enter Daphne, our ASGI-powered server of choice. Daphne is performant, reliable, and ready to handle the demands of our Django application. While there are other contenders like Gunicorn and Uvicorn, Daphne offers a unique advantage: the ability to run our Django application in debug mode with ASGI. This gives us a sneak peek into how our application will behave in production, ensuring a smooth transition when it’s time to go live.
To bring Daphne into our project, we’ve added it to our requirements.txt file. Next, we’ve made a small addition to our settings.py file, including 'daphne' in the INSTALLED_APPS list. This simple step unlocks Daphne’s development mode capabilities. Finally, we’ve pointed Django to our asgi.py file in the settings, officially enabling ASGI support for our application. Boom! Our application is now ready to rock in both synchronous and asynchronous modes.
Ready to unleash Daphne’s full potential in production? It’s a breeze! Just head over to the docker-compose.development.yml file for our Django application and swap out the default runserver command with a custom command to start the application using Daphne.
4.0 Hot Reloading and Debugging: A Developer's Dynamic Duo (with a Catch!)
Let’s dive into the world of rapid development with hot reloading and precise debugging. In this section, we’ll explore how to set up these powerful tools within our Dockerized Django environment. I’ll be using VS Code for this demonstration, but the concepts apply to other IDEs like IntelliJ IDEA as well. You’ll just need to adjust the configuration files accordingly.
Hot reloading is like magic for developers. It allows you to see the effects of your code changes instantly without manually restarting the server. Thankfully, Django comes with hot reloading enabled by default. As long as you’ve correctly mounted your application volume in your docker-compose setup, you can make changes to your Django files, and they’ll be reflected immediately in your running application. Talk about a productivity boost!

Now, let’s talk debugging. VS Code offers a handy feature called “Remote Explorer” that lets you open your source code directly from within a Docker container. However, we’re going to take a slightly different approach here. We’ll use the debugpy library, which allows us to attach a debugger to our running Docker container.
Here’s how it works:
1. We’ll configure debugpy in our manage.py file to listen on a specific port within our Docker container. This will only be enabled in debug mode or when we explicitly want to use breakpoints.
2. We’ll then set up our launch.json file in VS Code to connect the debugger to that port.
This way, when we set a breakpoint in our VS Code editor, the message is relayed to our Dockerized application through debugpy, pausing execution exactly where we want it.
from django.conf import settings

def main():
    """Run administrative tasks."""
    os.environ.setdefault('DJANGO_SETTINGS_MODULE', 'django_playground.settings')
    # if settings.DEBUG:
    #     if os.environ.get('RUN_MAIN') or os.environ.get('WERKZEUG_RUN_MAIN'):
    #         import debugpy
    #         debugpy.listen(("0.0.0.0", 4000))
    #         debugpy.wait_for_client()
    #         print('Attached!')
    try:
        from django.core.management import execute_from_command_line
Now, here’s the catch. In my experience, there’s a bit of a conflict between hot reloading and debugging in this setup. When both are enabled, any changes I make trigger a reload, which disconnects the debugger and throws a runtime exception. A bit annoying, right?
My workaround is to comment out the debugging code in manage.py when I need the seamless flow of hot reloading. I only enable it when I need to meticulously step through the code and don’t anticipate making frequent changes. It’s not ideal, but it gets the job done for now.
Hopefully, this little quirk will be ironed out in future Django or Docker updates. Fingers crossed!
5.0 GraphQL with a Strawberry Twist: Embracing Async
Now, let’s add some GraphQL magic to our Django application. I’m going to assume you’re already familiar with the wonders of GraphQL and the power of ASGI. If you need a refresher, I’ve included some helpful links in the resources section.
For those who haven’t experienced the joy of GraphQL, it’s a query language that gives you precise control over the data you fetch from a server. Think of it as ordering your data à la carte instead of getting a fixed-price menu. This brings some fantastic benefits:
1. Reduced Network Overhead: Only fetch the data you need, minimizing those costly network trips.
2. Improved Client Performance: Less data to process means a happier and faster client-side experience.
3. Efficient Data Retrieval: Grab multiple types of information with a single network call, reducing those back-and-forth requests.
I’m a big fan of GraphQL, especially for projects where I anticipate a growing and complex set of API endpoints. It keeps things organized and efficient.
While Graphene has been a popular choice for GraphQL in Django, I recently discovered that it doesn’t have the best support for asynchronous operations. That’s where Strawberry comes in! This modern Python and Django library embraces async and supports the latest GraphQL specifications, including subscriptions and websockets. Plus, it has a vibrant and growing community.
To get started with Strawberry, we’ll need to ensure ASGI is enabled in our Django project (remember Daphne from earlier?). Then, we’ll add Strawberry to our requirements.txt file. Next, we’ll define our GraphQL schema and resolvers in a schema.py file. Don’t worry, I’ll provide some helpful resources to guide you through this process.
Once our schema is ready, we’ll update our urls.py file to include the route to our GraphQL endpoint. And finally, we can test everything out using a GraphiQL IDE. It’s like a playground for your GraphQL queries!
6.0 CORS and CSRF: Guarding the Gates of Our API
Let’s talk security! When building web applications, it’s crucial to protect our API from unauthorized access and malicious attacks. That’s where Cross-Origin Resource Sharing (CORS) and Cross-Site Request Forgery (CSRF) protection come in.
CORS acts like a gatekeeper, controlling which external applications (those hosted on different domains) can access our Django server. Think of it as a guest list for our API. We specify the allowed origins in the HTTP headers of our server’s responses, ensuring that only trusted applications can access our precious resources.
CSRF, on the other hand, protects against a more insidious type of attack. Imagine an attacker exploiting a user’s authenticated session to perform unauthorized actions on their behalf. Not good! CSRF protection acts like a security guard, verifying that requests genuinely originate from the authenticated user and not a malicious third party. Django provides built-in CSRF protection through middleware, making our lives easier.
But here’s where things get interesting. Let’s say we have a frontend application, like Angular, that interacts with our GraphQL API. In this scenario, the frontend acts on behalf of the user, making requests to our backend. Our backend needs to be smart enough to distinguish between requests coming directly from the user and those coming from an authorized application (like our Angular frontend).
To achieve this delicate balance, our application will perform the following steps:
1. Setting the Stage with CORS Headers: First, we need to tell our Django application who’s allowed to knock on its door. We do this by configuring the CORS_ALLOWED_ORIGINS setting in our settings.py file. Here, we list the domains that have permission to access our API endpoints (e.g., google.com).
When a frontend application (or any other client) sends a request, Django checks the incoming request’s origin against this allowed list. Think of it as a bouncer at a club checking IDs.
But there’s more! Clients can also send a preflight OPTIONS request to our Django server. This is like asking the bouncer, “Hey, is my ID valid here?” Django responds with an HTTP response containing the list of allowed origins, confirming whether the client has access.
2. The CSRF Token – A Secret Handshake: Next, we leverage Django’s built-in CSRFViewMiddleware to enforce CSRF protection. This middleware acts as a vigilant guard, ensuring that every incoming request includes a valid CSRF token.
But what exactly are these tokens? Think of them as secret handshakes between our frontend and backend. They’re unique, unpredictable values that are generated by our Django application and stored as a cookie in the user’s browser.
Now, HTTP cookies are like little memory banks for websites. They store key-value pairs of data within a user’s browser session, containing information relevant to the site. Importantly, our backend application (Django) has granular control over these cookies. It can specify whether a cookie is read-only, accessible to JavaScript on the client-side, or even visible to third-party applications.
Since the backend knows that this information cannot be modified easily and that it can be set by the application itself, receiving a valid token assigned to a specific user is sort of a proof that the request is coming from an authorized source since a backend application will store a cookie only when the external application is allowed to access the endpoint.
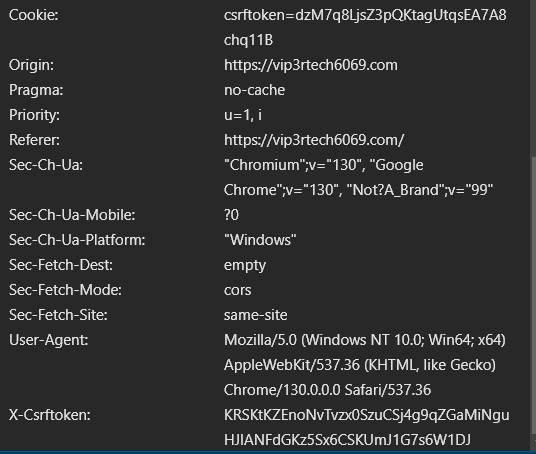
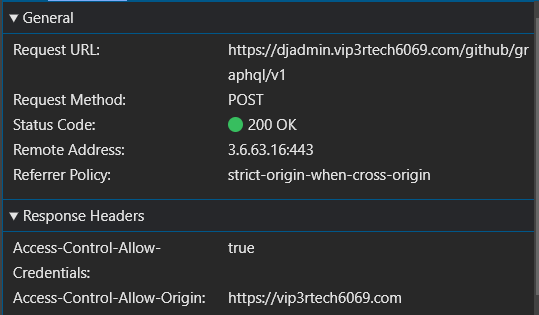
This control allows Django to store the CSRF token securely in a cookie that can only be read and modified by the backend itself. When a client application makes a request to our Django server, it automatically includes all relevant cookies in the HTTP request headers. You can see this in action in the adjacent image, where the Cookie header includes the csrftoken.
Cookie: csrftoken=dzM7q8LjsZ3pQKtagUtqsEA7A8chq11B
Since the backend knows this token is tamper-proof and can only be set by the application itself, receiving a valid token associated with a specific user acts as a strong indicator that the request is legitimate. It’s like the secret handshake confirming that the request is coming from a trusted source. After all, our backend application would only have set this cookie for authorized applications in the first place.
The good news is that configuring CORS and CSRF protection in Django is surprisingly straightforward. With just a few lines of code in our settings.py file, we can set up these security measures. But here’s the catch: while the configuration itself is simple, getting it to play nicely with an external frontend application can sometimes be a bit tricky. Trust me, I’ve encountered my fair share of frustrating issues when implementing CSRF protection in this scenario.
This article is already getting quite lengthy, so I’ll save the nitty-gritty details for a follow-up post. In part two of this series, we’ll dive deep into the implementation and testing of CORS and CSRF with an external frontend application. We’ll even use Chrome DevTools to analyze network requests and debug any errors, giving us a clear understanding of how to troubleshoot misconfigurations.
7.0 Conclusion
And there you have it! We’ve journeyed through the process of building a robust and efficient development environment for our Django application. By harnessing the power of Docker, we’ve created a containerized haven for our app, complete with a separate PostgreSQL database and an external network for seamless communication. We’ve unlocked the speed of asynchronous operations with Daphne, embraced the magic of hot reloading, and added a touch of GraphQL magic with Strawberry. And of course, we’ve fortified our API with CORS and CSRF protection, ensuring security and peace of mind.
This setup not only provides a solid foundation for our current project but also paves the way for future automation. Imagine a world where a single command spins up this entire environment, ready for development. We can strive towards this dream by:
1. Crafting Shell Scripts: We can encapsulate the Docker and Docker Compose commands into shell scripts, allowing us to execute the entire setup with a single call.
2. Exploring Infrastructure-as-Code: Tools like Terraform or Ansible can help us automate the provisioning of our Docker environment, including the creation of networks, volumes, and containers.
3. Leveraging Docker Compose Templates: We can create reusable Docker Compose templates that define common services and configurations, reducing duplication and simplifying environment creation.
By embracing these automation strategies, we can free ourselves from the tedious manual setup process and focus on what truly matters: building amazing applications.
I hope this article has been a valuable resource on your Django development journey. Remember, the quest for efficiency and automation is an ongoing one. Keep experimenting, keep learning, and keep building awesome things!
References
1. https://github.com/zuhairmhtb/DjangoPlayground
2. https://github.com/zuhairmhtb/ThePortfolioAdmin
3. https://medium.com/powered-by-django/deploy-django-using-docker-compose-windows-3068f2d981c4
4. https://medium.com/@robertjosephk/setting-up-keycloak-in-django-with-django-allauth-cfc84fdbfee2
5. https://dev.to/ferkarchiloff/how-to-debug-django-inside-a-docker-container-with-vscode-4ef9
6. https://testdriven.io/blog/django-debugging-vs-code/
7. https://strawberry.rocks/docs
8. https://docs.docker.com/get-started/
9. https://docs.docker.com/compose/how-tos/networking/
10. https://www.docker.com/blog/how-to-use-the-postgres-docker-official-image/
12. https://channels.readthedocs.io/en/latest/asgi.html
13. https://docs.djangoproject.com/en/5.1/howto/deployment/asgi/daphne/
14. https://code.visualstudio.com/docs/python/tutorial-django
16. https://github.com/microsoft/debugpy
17. https://strawberry.rocks/docs/concepts/async
18. https://developer.mozilla.org/en-US/docs/Web/HTTP/CORS
19. https://sucuri.net/guides/what-is-csrf/
20. https://owasp.org/www-community/attacks/csrf#overview
21. https://docs.djangoproject.com/en/5.1/ref/csrf/