Containerized Django Development: Part 3
CSRF and External Applications
1.0 Overview
Welcome back, security aficionados! This is the third and final chapter of our series on implementing CORS and CSRF with Django. If you have not read the previous two articles, I would highly recommend reading them first. I have provided the links to those articles below.
In the previous chapter of our containerized Django development saga, we conquered the realm of CORS, ensuring our application could safely communicate with trusted external origins. Now, we turn our attention to a different beast: Cross-Site Request Forgery (CSRF).
CSRF, a cunning adversary that exploits user trust, can wreak havoc on unsuspecting web applications. Imagine a malicious actor silently hijacking a user’s authenticated session to perform unauthorized actions. Not a pleasant scenario, is it?
In this installment, we’ll delve into the depths of CSRF protection, exploring how Django’s built-in mechanisms and the django-cors-headers library work in tandem to safeguard our GraphQL API. We’ll unravel the mysteries of CSRF tokens, uncover potential vulnerabilities, and equip ourselves with the knowledge to build a fortress against these insidious attacks.
Get ready to don your security armor and embark on a quest to fortify your Django application against the ever-present threat of CSRF!
2.0 Venturing Beyond the Walls: CORS and CSRF with External Applications
Our journey into Django’s security measures now takes us beyond the confines of our own application. We’ll explore how CORS and CSRF come into play when external applications, residing in different domains, attempt to interact with our Django backend.
2.1 The Setup
The beauty of this exploration is that it doesn’t require a full-fledged frontend application or even a GraphQL endpoint. Any external webpage with a console will suffice, allowing us to send cross-origin requests and witness the interplay of CORS and CSRF.
Our experiment will unfold in two stages:
1. The Unprotected Realm: We’ll begin with a clean slate, using Django’s default settings without any custom CORS or CSRF configurations. This will expose the vulnerabilities of an unprotected API to cross-origin requests.
2. Building the Fortress: We’ll then gradually introduce CORS and CSRF configurations, observing how each setting influences the response and strengthens our API’s defenses.
This two-pronged approach will provide a clear understanding of how CORS and CSRF work in tandem to protect our application from unauthorized cross-origin access.
2.2 The Experiment (GET requests from external app)

With our external application primed and ready, we fire off a GET request towards our Django backend. But instead of a warm welcome, we’re met with a formidable barrier:
Access to fetch at ‘http://localhost:8000/’ from origin ‘https://zohairmehtab.com’ has been blocked by CORS policy.
The browser, acting as a vigilant border guard, throws up a CORS error, preventing our external application from accessing the requested resource. Our request headers, as sparse as a desert landscape, offer no credentials to bypass this security checkpoint. The error message, however, offers a cryptic clue:
If an opaque response serves your needs, set the request’s mode to ‘no-cors’ to fetch the resource with CORS disabled.
This introduces us to the sec-fetch-mode header and the concept of “opaque responses.” While we won’t delve into the technical depths here (you can find more details in the resources section), we can experiment with this mode using the following code:
await fetch(“http://localhost:8000”, {mode: ‘no-cors’});
This modified request, bypassing CORS restrictions, elicits a successful response from our Django application. However, the response remains shrouded in mystery, an “opaque” entity devoid of accessible data.
This highlights a common misconception among new frontend developers. The CORS error, with its browser-side manifestation, can mislead one into believing the issue lies within the frontend code. But as our Django logs reveal, the request does reach the backend, triggering a response as shown in the bottom right image. This happens because even though our request reaches the backend, the browser prevents it as the HTTP response does not contain the url of our frontend application in its header that allow CORS. This is usually done by sending an OPTIONS request (or a pre-flight request) before the actual request.
This is where CORS steps in as the gatekeeper of cross-origin access. Without explicitly granting permission to our external application, even a simple GET request is denied entry. To overcome this CORS hurdle, we have two primary options:
1. The Open Door Policy: Allow requests from all external applications. This approach, while simple to implement, leaves our API vulnerable to any and all cross-origin requests. It’s a risky strategy best suited for scenarios where open access is desired.
2. The Guest List: Curate a list of trusted origins and grant access only to those specific applications. This approach offers a more secure and controlled environment, ensuring that only authorized parties can interact with our API.
For our purposes, we’ll adopt the more secure “guest list” approach, explicitly granting access to our external application through our settings.py file. This will demonstrate how to fine-tune CORS settings and establish secure communication channels with trusted external applications.
2.2.1 A Detour - Allowed Hosts
Before enabling CORS, we will take a detour – as we delve deeper into our CORS experiment, we encounter a perplexing error message:
Invalid HTTP_HOST header: ‘172.22.0.4:8000’. You may need to add ‘172.22.0.4’ to ALLOWED_HOSTS.
The IP address (172.22.0.4) in your log may be different but the message will be the same. This seemingly innocuous message raises two intriguing questions:
1. The Identity Crisis: Why does the error message point to 172.22.0.4:8000 when our application resides at localhost:8000?
2. The Host Conundrum: What exactly is ALLOWED_HOSTS, and how does it differ from CORS?
Unmasking the Docker Host
The answer to our first question lies within the realm of Docker. Our Django application, nestled within a Docker container, is assigned a private IP address (172.22.0.4 in this case) by the Docker network. This address, invisible to the outside world, serves as the internal identifier for our application within the containerized environment. You can compare to a VPC in cloud.
When a request arrives from our browser, it traverses through the web server, the Docker network, and finally reaches our Django application within the container. From Django’s perspective, the request originates from 172.22.0.4:8000, the internal address of the container.
This discrepancy between the external localhost address and the internal Docker address highlights the importance of configuring ALLOWED_HOSTS correctly, especially in production environments where debug mode is disabled.
ALLOWED_HOSTS vs. CORS: A Tale of Two Gatekeepers
This brings us to our second question: the distinction between ALLOWED_HOSTS and CORS. While both act as gatekeepers, they guard different aspects of our application:
1. ALLOWED_HOSTS: This setting focuses on the host receiving the request, ensuring that incoming requests are directed to valid and authorized URLs of our Django application. It’s a security measure against HTTP Host header attacks, preventing malicious actors from manipulating the Host header to redirect requests to unintended destinations. Please checkout the articles provided in references below to learn more about it.
2. CORS: This mechanism, on the other hand, focuses on the origin of the request, controlling which external domains are allowed to access our API. It’s designed to prevent cross-origin attacks, where malicious scripts from one domain attempt to access resources on another domain.
In essence, ALLOWED_HOSTS protects our application from attacks targeting the host itself, while CORS protects our API from unauthorized cross-origin access.
The Docker Advantage
This detour into ALLOWED_HOSTS highlights a key advantage of using Docker for development. By simulating a production environment, Docker exposes potential issues, such as misconfigured ALLOWED_HOSTS, that might otherwise go unnoticed until deployment. This allows us to address these issues early on, ensuring a smoother transition to production.
2.3 GraphQL API: Enabling CORS
With our ALLOWED_HOSTS configured correctly, we turn our attention to the GraphQL endpoint. Sending a POST request from our external application, we encounter a familiar foe: the CORS error. However, this time, the error message reveals a subtle difference:

It says “Response to preflight request doesn’t pass access control check: No ‘Access-Control-Allow-Origin’ header is present on the requested resource.”

This message hints at a behind-the-scenes exchange between the browser and our Django backend. Before sending the actual POST request, the browser dispatches a “preflight” OPTIONS request, essentially asking the server: “Hey, is it okay for this external application to access your resources?”
Unfortunately, our Django application, still operating under default settings, responds with a 405 Method Not Allowed error to this preflight request. This signals to the browser that the requesting origin is not authorized to access the resource, resulting in the CORS error.
Inspecting the network tab confirms this preflight exchange. We see the browser sending an OPTIONS request, followed by the server’s 405 response. This exchange highlights the browser’s role as a security enforcer, actively preventing cross-origin requests that haven’t been explicitly allowed by the server.
To fix this error we need to add the domain of our frontend application to the list of ‘CORS_ALLOWED_ORIGINS’ in settings.py. This whitelist acts as a VIP pass, allowing requests from the specified origins to bypass the CORS restrictions and access our GraphQL endpoint.
By configuring CORS_ALLOWED_ORIGINS, we establish a secure communication channel between our frontend and backend, enabling seamless interaction while upholding the principles of cross-origin security.
To truly tame the CORS beast and grant access to our external application, we enlist the help of the django-cors-headers library. This powerful tool provides fine-grained control over CORS settings, allowing us to define precisely who can access our API and how. Integrating django-cors-headers involves three key steps in our settings.py file:
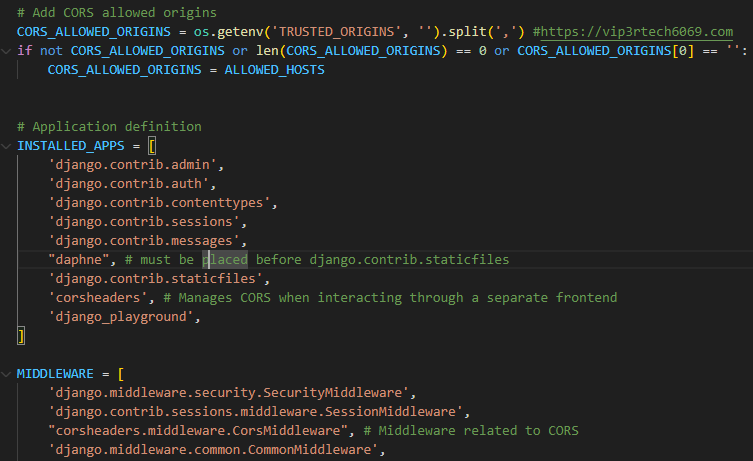
1. CORS_ALLOWED_ORIGINS: This is where we define our guest list, specifying the allowed origins as a list of Fully Qualified Domain Names (FQDNs). In our case, we’ll add https://zohairmehtab.com to grant access to our external application.
2. INSTALLED_APPS: We need to register the django-cors-headers library with our Django application by adding corsheaders to the INSTALLED_APPS list. This makes the library’s functionality available throughout our project.
3. MIDDLEWARE: The corsheaders.middleware.CorsMiddleware acts as our CORS enforcer, intercepting requests and validating their origins against our allowed list. We add this middleware to our MIDDLEWARE list, ensuring that CORS checks are performed before any other processing.
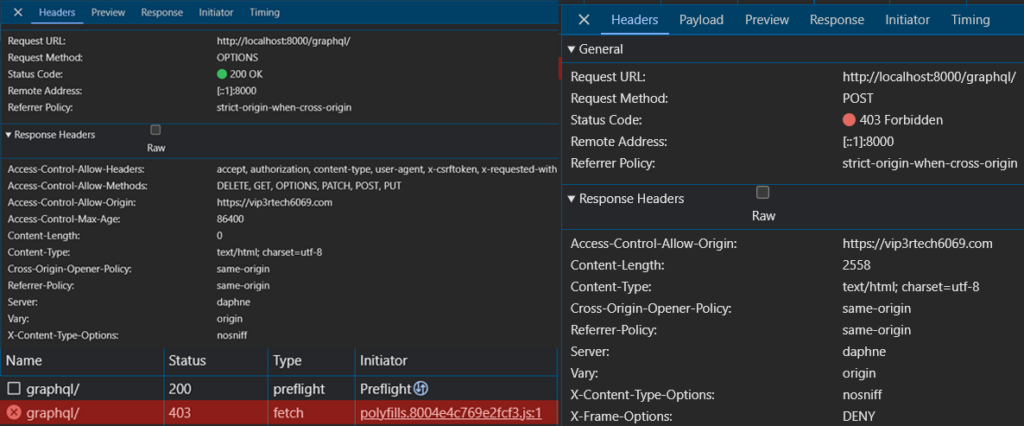
With these configurations in place, we revisit our incognito window and send another GraphQL request. This time, the CORS error that previously plagued us vanishes, replaced by a new message: a 403 Forbidden error.
Examining the network tab (image provided above), we observe a successful preflight OPTIONS request, followed by the 403 error on the actual POST request. This indicates that CORS is no longer the culprit. Our external application has been granted access, but another security layer is now blocking the request. However, with CORS enabled we can successfully send GET requests to our backend application.
The response headers from our Django application now include a set of CORS-related headers: Access-Control-Allow-Origin, Access-Control-Allow-Headers, Access-Control-Allow-Methods, and Access-Control-Max-Age.
These headers, set by the django-cors-headers library, provide detailed instructions to the browser about the allowed origins, methods, and headers for the requested resource. They act as a communication bridge between our backend and the browser, ensuring that cross-origin requests are handled securely and efficiently.
While we’ll focus on Access-Control-Allow-Origin for now, these headers offer a wealth of customization options, allowing us to fine-tune our CORS policies to meet the specific needs of our application.
2.4 GraphQL Api: Enabling CSRF
With CORS successfully configured, we might assume our GraphQL API is now secure. However, as we learned in our earlier exploration of Django views, CORS alone doesn’t guarantee complete protection. Enter CSRF, a threat that lurks in the shadows, ready to exploit authenticated sessions.
When we attempt to send a POST request to our GraphQL endpoint from our incognito window, we encounter a familiar foe: the 403 Forbidden error. Peeking into our Django logs, we find the culprit: Forbidden (CSRF cookie not set.): /graphql/.
This error message highlights the missing piece of the puzzle: the CSRF token. To successfully navigate this security checkpoint, we need to equip our frontend application with a valid CSRF token, just as we did with our Django views. Enabling CSRF protection for our GraphQL API involves two crucial steps:
2.4.1 Set-Cookie header with HTTP response
We need to configure Django to include a Set-Cookie header in its HTTP responses, providing the frontend application with a CSRF token to store in its cookie jar. This token acts as a badge of authenticity, allowing the backend to identify requests originating from trusted sources.
Unlike our Django views, where the CSRF token is readily available within the HTML form, our GraphQL API deals with JSON responses. These responses lack the necessary structure to embed a CSRF token directly.
To overcome this challenge, we can leverage the power of CORS. Since our frontend application is now authorized to send cross-origin requests, we can create a dedicated REST endpoint in our Django backend that serves the sole purpose of providing a valid CSRF token. This endpoint will trigger the Set-Cookie header, equipping our frontend with the necessary token for subsequent GraphQL requests.
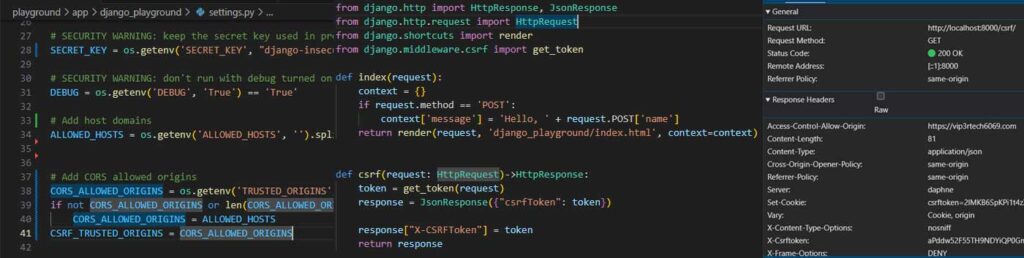
To empower our frontend application with the necessary CSRF protection, we need to make a few adjustments to our Django backend. This involves modifying two key files:
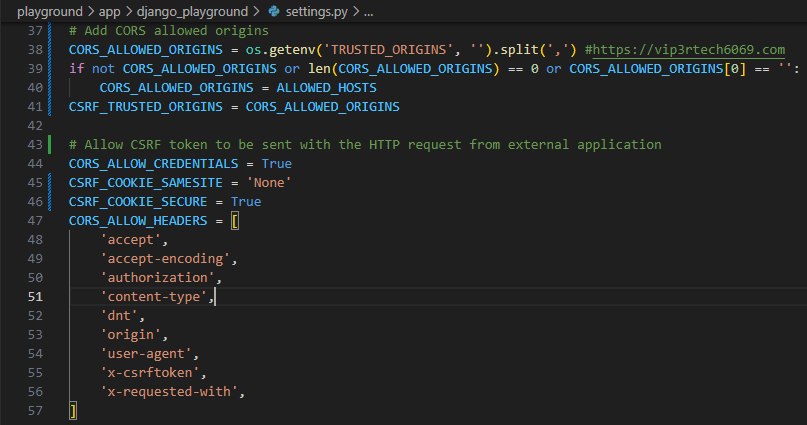
1. settings.py (left image): We introduce a new setting called CSRF_TRUSTED_ORIGINS. This setting, similar to CORS_ALLOWED_ORIGINS, allows us to specify a list of trusted origins that are permitted to receive CSRF tokens. For our current setup, we’ll keep the values identical to our CORS settings, ensuring consistency between allowed origins for both CORS and CSRF.
However, it’s worth noting that these two settings can diverge based on our application’s security requirements. For instance, we might have an external application that only needs read access to our API. In such cases, we can include its origin in CORS_ALLOWED_ORIGINS but exclude it from CSRF_TRUSTED_ORIGINS, effectively preventing it from performing any state-changing actions.
2. views.py (center image): We add a new endpoint called csrf to our views.py file. This endpoint serves a single purpose: generating and returning a valid CSRF token. By leveraging Django’s built-in csrf module, we can easily create a view that returns a JSON response containing the CSRF token. When the frontend application accesses this endpoint, Django automatically includes the Set-Cookie header, instructing the browser to store the token securely.
With these modifications in place, we send a GET request to our newly created /csrf endpoint from our frontend application. As expected, a familiar face greets us in the response headers: the Set-Cookie header, accompanied by a shiny new CSRF token ready to be stored in the browser’s cookie jar (right image).
While this marks a significant step forward, we mustn’t forget the lessons learned from our previous exploration of Django views. Simply possessing the cookie-based CSRF token isn’t sufficient for POST requests. Django’s CsrfViewMiddleware demands a second token, embedded within the request payload, to complete the authentication puzzle.
This realization leads us to the next crucial step in our CSRF implementation: equipping our frontend application with the ability to include this payload token in its GraphQL requests.
2.4.2 X-CsrfToken in the Header
As we venture deeper into the realm of CSRF protection for our GraphQL API, we encounter a unique challenge. Unlike traditional Django views, where the CSRF token is conveniently embedded within HTML forms, our API relies on JSON or XML for data exchange. This poses a problem: how do we include the CSRF token in these non-form-based requests?
Django, ever resourceful, provides a solution: the X-CsrfToken header. This custom HTTP header allows us to securely transmit the CSRF token alongside our API requests, regardless of the data format. Django even sets the stage for this by including the X-CsrfToken header in its own responses, hinting at the preferred method for CSRF token delivery.
Therefore, our frontend application can retrieve the CSRF token from the /csrf endpoint and include it as the X-CsrfToken header in all subsequent POST requests to the GraphQL endpoint.
However, there’s a crucial detail we mustn’t overlook: CORS. Recall that we can (and should) define which custom headers are allowed in cross-origin requests. Since X-CsrfToken is a custom header, we need to explicitly grant permission for it within our CORS configuration.
To ensure seamless and secure communication between our frontend and backend, we need to fine-tune our CORS and CSRF settings in settings.py. Here’s a breakdown of the key variables involved:
1. CORS_ALLOW_CREDENTIALS: This setting enables the exchange of cookies between our frontend and backend, allowing the browser to include the CSRF token (stored as a cookie) in cross-origin requests. This variable is used by our django-cors-headers library.
2. CSRF_COOKIE_SAMESITE: The function of this variable is similar to that of CORS_ALLOW_CREDENTIALS. However, this is used for CSRF protection and not CORS. This setting governs the SameSite attribute of the CSRF cookie, which dictates how the cookie is handled in cross-site requests. For our cross-origin scenario, we set it to None to allow the cookie to be sent. I will not get into the details of it but I will provide link to resources to learn more about it.
3. CSRF_COOKIE_SECURE: This setting enforces the use of HTTPS for transmitting the CSRF cookie, a crucial security measure for production environments. Since our frontend application uses HTTPS (https://zohairmehtab.com), we set this to True. When you are running the application in development mode and all the communication is taking place between applications running on localhost, you can probably set it to False and CSRF_COOKIE_SAMESITE to Lax.
4. CORS_ALLOW_HEADERS: This setting defines the list of allowed custom headers in cross-origin requests. We add x-csrftoken to this list, granting permission for our frontend to include the X-CsrfToken header.
With these configurations in place, our application is well-equipped to handle CSRF tokens securely. Our frontend can now fetch a CSRF token from the /csrf endpoint and include it as the X-CsrfToken header in all POST requests to the GraphQL API, ensuring robust protection against CSRF attacks.
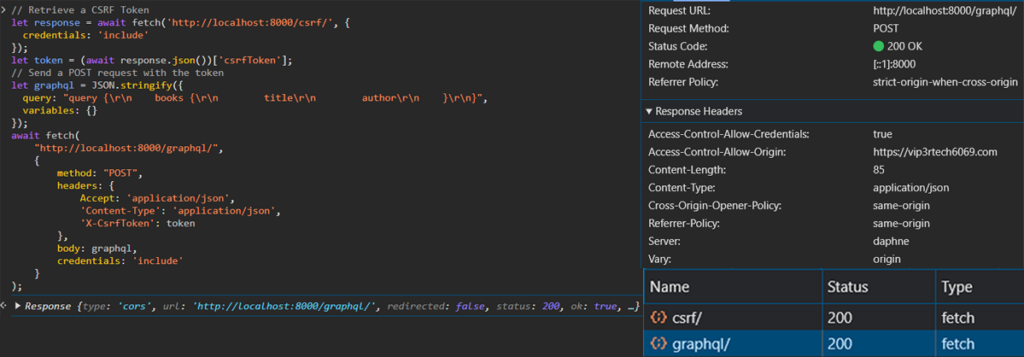
With all the pieces in place, we can finally witness the fruits of our labor. Our frontend application, armed with the CSRF token and empowered by our CORS configuration, can now securely communicate with our Django GraphQL API.
Observe the JavaScript code that sends the POST request: the credentials: include option instructs the browser to include cookies and authentication tokens in cross-origin requests. This ensures that the CSRF token, stored as a cookie, is sent along with the request.
The code first fetches the CSRF token from the /csrf endpoint and then includes it as the X-CsrfToken header in the subsequent POST request to the GraphQL endpoint. This two-step process ensures that both the cookie-based token and the payload token are present, satisfying Django’s CSRF protection mechanism.
With CORS and CSRF configured correctly, our frontend application can now seamlessly interact with our backend API, enjoying the benefits of secure cross-origin communication. We’ve successfully fortified our application against CSRF attacks, ensuring that only authorized requests are processed.
3.0 Summary
As we conclude our epic journey through the realms of CORS and CSRF, let’s recap the essential steps for securing your Django application:
1. Enlist the django-cors-headers Library: Install this powerful tool to gain fine-grained control over your CORS configuration.
2. Define Your ALLOWED_HOSTS: Ensure this setting accurately reflects the valid domains associated with your Django application, preventing HTTP Host header attacks.
3. Grant Access with CORS_ALLOWED_ORIGINS: Specify the trusted origins that are permitted to access your API’s resources.
4. Activate the CORS Middleware: Add the corsheaders app to INSTALLED_APPS and the CorsMiddleware to MIDDLEWARE, ensuring it’s positioned correctly between SessionMiddleware and CommonMiddleware.
5. Enable Credentials with CORS_ALLOW_CREDENTIALS: Allow the exchange of cookies between your frontend and backend, enabling the transmission of CSRF tokens.
6. Configure CSRF_COOKIE_SAMESITE: Set this to None for cross-origin requests or Lax if both your frontend and backend are on localhost.
7. Secure Your Cookies with CSRF_COOKIE_SECURE: Enforce HTTPS for CSRF cookies in production or when your frontend uses HTTPS.
8. Allow Custom Headers with CORS_ALLOW_HEADERS: Include any custom headers, such as X-CsrfToken, that your frontend needs to send in cross-origin requests.
9. Create a CSRF Endpoint: Provide a dedicated endpoint in your Django application that generates and returns a valid CSRF token to your frontend application.
By following this checklist, you can confidently secure your Django application against CORS and CSRF vulnerabilities, ensuring a safe and protected environment for your users and your data.
4.0 Conclusion
Configuring secure communication between applications residing in different origins can be quite a challenge, as I’ve learned firsthand. I vividly recall those early days of web development, spending countless hours wrestling with CORS configurations and trying to decipher the browser’s often cryptic error messages. It was a frustrating experience, to say the least.
However, as I delved deeper into the world of web security, I began to appreciate the intricate dance between CORS, CSRF, and Django’s security mechanisms. Understanding the roles of each player involved transformed this once-daunting task into a manageable and even enjoyable process.
This three-part series has been a journey of discovery, not just for my readers, but for myself as well. By meticulously documenting each step and crafting reusable code, I’ve solidified my own understanding of these crucial security concepts. Writing about these intricacies, explaining the challenges and solutions, has helped me internalize the knowledge in a way that simply reading documentation could never achieve.
While this series marks the end of our current exploration, it’s by no means the end of my learning journey in web security. This vast and ever-evolving field demands constant learning and adaptation. But armed with the knowledge and tools gained from this series, I feel confident in my ability to face new challenges and build secure, resilient applications.
I hope this series has provided valuable insights and guidance to fellow developers navigating the complexities of CORS and CSRF. May your applications remain secure, your users protected, and your coding endeavors filled with the satisfaction of creating robust and reliable web experiences.
References
1. https://github.com/zuhairmhtb/DjangoPlayground
2. https://github.com/zuhairmhtb/ThePortfolioAdmin
5. https://developer.mozilla.org/en-US/docs/Web/HTTP/Headers/Cross-Origin-Opener-Policy
6. https://cheatsheetseries.owasp.org/cheatsheets/HTTP_Headers_Cheat_Sheet.html
7. https://developer.mozilla.org/en-US/docs/Web/HTTP/Headers/Sec-Fetch-Mode
8. https://developer.mozilla.org/en-US/docs/Web/HTTP/Headers/Host
9. https://docs.djangoproject.com/en/5.1/ref/settings/
10. https://developer.mozilla.org/en-US/docs/Web/HTTP/Headers/Set-Cookie#samesitesamesite-value